Showing posts with label informal bonsai. Show all posts

Sunday, September 15, 2013

Old Juniper gets a major styling

This Juniper is closing in on 40 years old, and has gone through a great deal of changes since it came into my hands as pre-bonsai material about 4 years ago.   Found a great deal of deadwood on the tree to turn into Jin and Shari work this go-around.  Cleaned it up; some more work to be done on it but this is it for the weekend.  Will soon pay more attention to the pads and also to cleaning the trunk up a little better.


How it started; quite leggy and have not given it the attention it needs to piching..


Found a healthy live vein runing down the back, allowing for the exposure of some great deadwood down the front and worked it into the existing Jins.


Close up, still some carving to do and cleanup, nice living vein down the left here.


Parked the tree for now  Fired the deadwood some, and a good deal of wiring and pinching all over.


Wednesday, June 19, 2013

Smaller informal style Privet Bonsai - a bit dainty

This little tree has nice movement to my eye, and will heal quickly the sore from the cut I made to give it that 'curve' motion.  Another of my test subject privet bonsai that actually has some small potential.


These pics being almost 2 weeks old;  I've had endless rain here the past 2 weeks, the growth showing now is about double what this pic shows.  The tree is doing well in it's first pot after moving from a small 1/2 gal planter.

Another Privet Bonsai gets it's first pot

I have used privet to test my bonsai knowledge over the years, and although not the best tree/bush for presentation, it has many attributes that make it a good species for learners;  it grows like nuts (it's classified as a weed), roots like mad and puts out alot of growth for you to play with.  Hardy, and springs bad furiously in springtime, usually holding a significant number of leaves through the winter.  Best of all if you live in more humid areas, or namely the southeast US - it's likely in your back yard or along your fence line...  :)

I'm working on alot of other species too, but my larger and more interesting privet are all up for pot moves right now, so they get some air time..  :)


Even though this is currently a 'side' I think this will become it's front next re-potting or pot change it has.

This is a pot that I made from one of my pot creation sessions a few years ago.  I dig the crackle pops in the glaze that was used.  (I have it around here somewhere)

Sunday, April 10, 2011

Privet enters into a new future as Bonsai

This Privet soon-to-be-bonsai has been collected for about 14 months.   Right after collection I moved it into my garden in the ground, with a large flat brick underneath the root ball.   It's a single trunk, will be 'informal' style tree.   The many privet I have collected, I use as training trees before I move into more common (and less hardy in comparison) trees.  However some of the Privet - are pretty interesting in their own right (down the road more likely).
Here you can see it has a pretty decently flat root base as is.  Time to bare root all this famous 'Georgia Red Clay' and good soil I used around the root ball when I first collected.

All clean, lots of good roots here.  Time to reduce the root ball's height so it can fit into a pot snugly. 

The pot.  Training pot for sure, it will go into something smaller in the future.  The soil.  This mix is approx. 30% oil-dry (NAPA product, 100% fired earth), 20% coarse builder sand, 40% lava rock, and 10% organic sphagnum moss.  (Need a little organic for Georgia's hot summers..)

Happily potted up, some wire through the drain holes to hold it in place.  Time to take it inside and do a little more work. 

I think this is the front that I will use for now. 

Quite a trimming (generally safe for Privet, they grow like mad and I sealed all cuts well).   Poor man's measuring stick (the lighter).    

A pic from the rear, the nabari look decent from here as well.   Could go either way, will see which side strikes best for the lead to a final apex.

Close-up of the nabari from the rear. 

Close-up of the trunk/nabari from the current front. 

From the ground up, it's 12 inches, 6.5 inches to the main trunk 'chop'.  Approx 2.25 inches at base with 1.5 inches being main thickness of trunk to the 'chop' line.

Lots of fun with this project, I have many more privet to unearth in the near future.  Maybe 1-2 more before this spring gets in full gear, many more next spring for certain.

Sunday, September 27, 2009

2 Friends + 2 trees = Good Times

This was a planned project; My best friend Aaron and I planned to work on 2 trees one evening, and have a ‘sculpting’ night with trees instead of just making bonsai pots.   I picked up 2 Dwarf Japanese Juniper plants, (or Juniperus Procumbens ‘nana’ for those who also desire species knowledge.) from one of my more favorite nurseries to haunt.   

We each got a tree – mine was more directional and ‘whispy’, it would need a lot of removal and vision to make use of some of the branches it came with.  Aarons on the other hand looked really bushy; but underneath it held a few firm, good branches to work off of to build pads.

While we did not discuss this beforehand – in hindsight I can see immediately that we each picked the same style, but different ‘method’ of presentation.  We both created an ‘Informal’ tree – that is, a tree that goes up, but has bends in it’s main trunk, and is not straight from ground to apex.   However, I went with a ‘Far’ view of the tree, while Aaron created a ‘near’ view of his tree.   I believe that we internally arrived at these decisions based on the material, and also the ‘vision’ we each inferred from our little trees.  This I found interesting in itself – as this was Aaron’s first real ‘tree sculpting’ (and first time I ever guided anyone through the process), yet we both came out with some interesting creations.

Take a look!

Aaron’s 1st Bonsai sculpting – Informal Bonsai ‘Near’ view

This is what he started with, after cleaning all the dead material off and getting it 'cleaned’ and ready for action.


Rotated it slightly to find it’s front, and this is after branch removal, wiring, and some pad work.


All cleaned up, final trims and pinches done.


A view from higher up, you can see the pads already nicely formed – I think Aaron’s done a great job on his first tree sculpting.

JayVee’s Informal Juniper #4 – ‘Far’ View

Here’s what I started with; alot of motion in the main trunk, with many branches to work on (and remove – too ‘sticky’)


I found it’s front, and moved many branches around.  Looking to form a broad crown, from left to right with the apex in the current ‘center’ of the tree.  Lots of shari to create on this one!


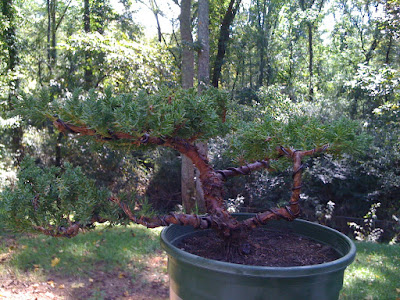
Shari worked in, nothing too eye boggling for now.  I have a good vision for this little tree, it’s going to have a ‘Far’ view – that is, seen better from a few feet away and thought of as seen from a ‘distance’ than right up under it’s branches.  In time, it will look good from anywhere..  :)


View from the left rear angle; Here you can see the trunk motion a bit better; very angled with ‘masculine’ features in this already masculine species.  I’ll be making a rectangle pot with strong features to put this little Juniper into next spring!

It was a great evening; hanging out with my best friend since childhood, working on trees and teaching the little knowledge I’m ‘sure’ of so far into my Bonsai experience.  Good times..   :)

Saturday, September 5, 2009

Elk - Parson’s Juniper; Informal Juniper #3

Informal Style Parson’s Juniper

Sometimes, the ‘bug’ to sculpt a tree can backfire; if you’re always looking for the ‘perfect’ tree while you’re hunting for material. A quick stroll through typical nurseries generally results in the ‘worst’ looking plants being the ‘best’ material for bonsai (nursery plants are usually clipped and grown in forms for landscaping – not developing miniature trees). Often the finds in the half-off areas, are the ‘bulky stumpy’ plants that generally aren’t great to start with for landscaping. For instance, this Parson’s Juniper! What the heck did I see in this pot when I decided to buy it? Well, I certainly didn’t see the ‘perfect’ tree – what I actually saw was more spirit and energy than a vision of what it might become. After 20 minutes and half an acre walked, I returned to pick up this $5.98 ‘landscape’ material from the ‘toss’ zone in the corner of the nursery.

I did see a tree in there; a different kind of tree for me – a chance to try a few new techniques. Here I’ve removed a great deal of foliage to expose the very strong trunk, which has very strong motion (I was torn between taking it towards a cascade in 2-3 years – or a unique form right away). I removed many weak branches and start to eye up how the tree will shape. I drilled slightly into the branch cuts forward facing in the picture to the right; as the wounds heal, this will give it a ‘circular’ heal that is slightly hollowed which will give the effect of an aged appearance to the trunk as it heals.

So, you can see the effects of wiring, and a great reduction in the existing growth; Where is the tree you’re thinking? As I said this was a unique work for me, I never thought I’d give a tree a name, but this one is going to be called ‘Elk’. Many strong branches that I redirected to spread out the future pad zones I saw in the image of this tree. There are not many branches that are not wired; I wanted to give ‘Elk’ the instant power and presence I felt as I worked on it. Very healthy tree, for such large branches they were easier to move than the Blauuw Juniper I last worked on.


Elk – Informal Style Parson’s Juniper (Juniperus Parsonii)

A little Jin and shari work in a few places - now you may see what I felt, when I decided to call it Elk. It looks horrible if judged against ‘classic’ styles. The raised branches near the shari, gives the impression of antlers sweeping back from the face (shari) of the Elk. Oh well, at least it sounds good on paper.. :) This tree may stay ‘ugly’ for a while until it fills out, but I believe it will have a powerful presence in a few years with a little thickening of some of it’s ‘antlers’.

Sunday, August 16, 2009

Tree underneath the Nursery beginnings - Informal Juniper #2

Juniper 'Blaauw'

Original picture of the tree, straight from the Nursery, and taking some time to get healthy. This little tree caught my eye, I love the motion in the trunk.. I've been nursing it to good health for a few months now, it felt right to go ahead and begin it's styling, as I also have a nice home for it in the 'Log Pot' - at least a starting home as it's root reduction begins.


Informal Juniper Beginnings

I will be leaving it in the pot throughout winter I do believe, as it's too close to the end of the year for such a cutback and root pruning at the same time in my opinion with this species (This isn't Privet!). A few branches were left to work some Jin into - look forward to working on this one again next year. This tree will go into the new 'Log Pot' that was made with the last batch of Pots.


Home & Garden Blogs submit to reddit Blogarama - Blog Directory blog search directory Hobbies Blogs - Blog Rankings Blogs lists and reviews Blog Directory Bodhisattva Bonsai - Blogged Blog Ratings Web Directory Top Blogs - Increase SEO of Your Blog, Blogging Resources Gardening Blogroll Center Award Winning Home and Garden Blogs - BlogCatalog Blog Directory