Sunday, September 27, 2009

2 Friends + 2 trees = Good Times

This was a planned project; My best friend Aaron and I planned to work on 2 trees one evening, and have a ‘sculpting’ night with trees instead of just making bonsai pots.   I picked up 2 Dwarf Japanese Juniper plants, (or Juniperus Procumbens ‘nana’ for those who also desire species knowledge.) from one of my more favorite nurseries to haunt.   

We each got a tree – mine was more directional and ‘whispy’, it would need a lot of removal and vision to make use of some of the branches it came with.  Aarons on the other hand looked really bushy; but underneath it held a few firm, good branches to work off of to build pads.

While we did not discuss this beforehand – in hindsight I can see immediately that we each picked the same style, but different ‘method’ of presentation.  We both created an ‘Informal’ tree – that is, a tree that goes up, but has bends in it’s main trunk, and is not straight from ground to apex.   However, I went with a ‘Far’ view of the tree, while Aaron created a ‘near’ view of his tree.   I believe that we internally arrived at these decisions based on the material, and also the ‘vision’ we each inferred from our little trees.  This I found interesting in itself – as this was Aaron’s first real ‘tree sculpting’ (and first time I ever guided anyone through the process), yet we both came out with some interesting creations.

Take a look!

Aaron’s 1st Bonsai sculpting – Informal Bonsai ‘Near’ view

This is what he started with, after cleaning all the dead material off and getting it 'cleaned’ and ready for action.


Rotated it slightly to find it’s front, and this is after branch removal, wiring, and some pad work.


All cleaned up, final trims and pinches done.


A view from higher up, you can see the pads already nicely formed – I think Aaron’s done a great job on his first tree sculpting.

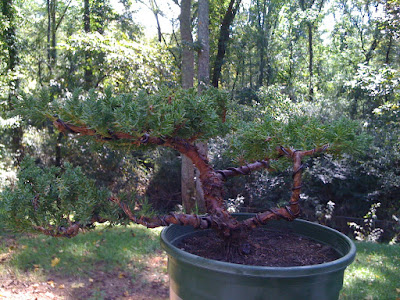
JayVee’s Informal Juniper #4 – ‘Far’ View

Here’s what I started with; alot of motion in the main trunk, with many branches to work on (and remove – too ‘sticky’)


I found it’s front, and moved many branches around.  Looking to form a broad crown, from left to right with the apex in the current ‘center’ of the tree.  Lots of shari to create on this one!


Shari worked in, nothing too eye boggling for now.  I have a good vision for this little tree, it’s going to have a ‘Far’ view – that is, seen better from a few feet away and thought of as seen from a ‘distance’ than right up under it’s branches.  In time, it will look good from anywhere..  :)


View from the left rear angle; Here you can see the trunk motion a bit better; very angled with ‘masculine’ features in this already masculine species.  I’ll be making a rectangle pot with strong features to put this little Juniper into next spring!

It was a great evening; hanging out with my best friend since childhood, working on trees and teaching the little knowledge I’m ‘sure’ of so far into my Bonsai experience.  Good times..   :)

Friday, September 18, 2009

Pots on Parade

It’s that time again! We’re slowly building a collection of handmade pots to fire up! Here are a few pictures; Above are a few larger of the ‘round’ pot designs we’ve come up with, also my attempt at a handmade ‘Oval’ without doing it with slabs. (Wish I had now!) Also a ‘turtle’ pot from Aaron – some nice etching on the sides (we’ll show that off once it’s glazed and finished)

Aaron designed a really beautiful pot a week or so ago – a shallow round with a slight ‘drum’ curve to the lip. What’s really incredible is that he fashioned all 3 legs as separate ‘tree’ legs with branches, then attached them to the pot and molded them in. It dried upside down and we’re not wanting it to rest on the legs until it’s fired initially. (They are stable – but can’t be too safe with clay)

Here’s my attempt at a small Cascade style pot – I molded it from a paintbrush holder/vase my wife has. I lost some of the form in the middle but was able to rough out an interesting lip. I’m thinking this will be a ‘Shohin’ Cascade pot, but we’ll see how big a tree I can get in there! :)

Fresh pots – still wet from making last night. Here I have a decent ‘copy’ of Aaron’s infamous ‘round’ pot that I so love.. Also my first attempt at a somewhat deep ‘drum’ pot. I have alot to learn about making a drum pot I can see..

Aaron decided he wanted to make a very big pot – with strong masculine features. He decided on a rectangle, and then took it a step further. He’s stuck clay ‘bricks’ on the side to give the impression of an old brick wall where the bricks have fallen away revealing the mortared surface underneath. Looks really great, and it’s not even dry yet. Once it gets more solid it’ll be flipped and legs attached.

Saturday, September 5, 2009

Elk - Parson’s Juniper; Informal Juniper #3

Informal Style Parson’s Juniper

Sometimes, the ‘bug’ to sculpt a tree can backfire; if you’re always looking for the ‘perfect’ tree while you’re hunting for material. A quick stroll through typical nurseries generally results in the ‘worst’ looking plants being the ‘best’ material for bonsai (nursery plants are usually clipped and grown in forms for landscaping – not developing miniature trees). Often the finds in the half-off areas, are the ‘bulky stumpy’ plants that generally aren’t great to start with for landscaping. For instance, this Parson’s Juniper! What the heck did I see in this pot when I decided to buy it? Well, I certainly didn’t see the ‘perfect’ tree – what I actually saw was more spirit and energy than a vision of what it might become. After 20 minutes and half an acre walked, I returned to pick up this $5.98 ‘landscape’ material from the ‘toss’ zone in the corner of the nursery.

I did see a tree in there; a different kind of tree for me – a chance to try a few new techniques. Here I’ve removed a great deal of foliage to expose the very strong trunk, which has very strong motion (I was torn between taking it towards a cascade in 2-3 years – or a unique form right away). I removed many weak branches and start to eye up how the tree will shape. I drilled slightly into the branch cuts forward facing in the picture to the right; as the wounds heal, this will give it a ‘circular’ heal that is slightly hollowed which will give the effect of an aged appearance to the trunk as it heals.

So, you can see the effects of wiring, and a great reduction in the existing growth; Where is the tree you’re thinking? As I said this was a unique work for me, I never thought I’d give a tree a name, but this one is going to be called ‘Elk’. Many strong branches that I redirected to spread out the future pad zones I saw in the image of this tree. There are not many branches that are not wired; I wanted to give ‘Elk’ the instant power and presence I felt as I worked on it. Very healthy tree, for such large branches they were easier to move than the Blauuw Juniper I last worked on.


Elk – Informal Style Parson’s Juniper (Juniperus Parsonii)

A little Jin and shari work in a few places - now you may see what I felt, when I decided to call it Elk. It looks horrible if judged against ‘classic’ styles. The raised branches near the shari, gives the impression of antlers sweeping back from the face (shari) of the Elk. Oh well, at least it sounds good on paper.. :) This tree may stay ‘ugly’ for a while until it fills out, but I believe it will have a powerful presence in a few years with a little thickening of some of it’s ‘antlers’.

Wednesday, August 26, 2009

Japanese Boxwood - better view

Japanese Boxwood #1

A few people were really interested to see a better picture of this tree (The photos I used last time I kept small so I could try to 'spice up' the blog post!). Here's a better picture - I really like the image this little tree is sending me!

Sunday, August 23, 2009

Japanese Boxwood #1

Japanese Boxwood #1
Informal Style


Well... The bug bit me again today while out shopping today at a local hardware/gardening store for a few things for the house. This Japanese Boxwood nursery plant is going to become my next project today. For $5.99, the hours of work I put into it and enjoyment of the finished product are priceless, in my opinion. Oddly enough, many of the boxwoods of this size today looked like great 'potensai' - or, 'prebonsai' as it's termed by some. This little tree has a nice trunk already developed and looks nicely aged with rough bark deep into the top branches. Boxwood species are much like Holly; they can get 'sticky' after the branches mature past the fresh 'green' stage. They can be more difficult to Jin as the branches thicken. This tree has good motion hidden underneath these leaves!


A few hours of pruning, deleafing, bending and wiring (even got a guy wire in on this one) I can see the vision that the Boxwood was giving me the vibes of; The beginnings of a stately informal style tree. I'm no stickler for 'forms' or 'styles', but when one suits decidedly what I'm aiming for - I properly label it. An 'Informal' style tree means that for the most, the main trunk aims upward, but not 'straight' that it has some degree of bend or 'taper' in the main trunk(s).


Here is what will become the 'back' of the tree. Well honestly - I'm not sure yet which is front or back, there are strengths to both views (which means it'll look good from any angle, good radial of the branches as long as they all live through their Jinning!) Good exercise in wiring for me, I need to go back and re-wire and add wire to some existing trees to give them more direction - this tree certainly has shown me how much direction you can truly give with wire. The end goal in this Informal style, is for a very heavily rammified Crown to the tree. This will cause the leaves to grow smaller, and will also create thick, healthy growth that will thicken the crown of this Japanese Boxwood nicely.


Sunday, August 16, 2009

Tree underneath the Nursery beginnings - Informal Juniper #2

Juniper 'Blaauw'

Original picture of the tree, straight from the Nursery, and taking some time to get healthy. This little tree caught my eye, I love the motion in the trunk.. I've been nursing it to good health for a few months now, it felt right to go ahead and begin it's styling, as I also have a nice home for it in the 'Log Pot' - at least a starting home as it's root reduction begins.


Informal Juniper Beginnings

I will be leaving it in the pot throughout winter I do believe, as it's too close to the end of the year for such a cutback and root pruning at the same time in my opinion with this species (This isn't Privet!). A few branches were left to work some Jin into - look forward to working on this one again next year. This tree will go into the new 'Log Pot' that was made with the last batch of Pots.


All fired up

Bonsai Pots all fired and ready to go
They all made it! A bit brighter than we figured for some, but this is our chance to figure out what we want to do and to 'not do' when the pot making winter season hits us.

Mame pots

2 from Aaron, and my contribution on the right. These came out actually rather nice, 3 different styles of pot and painting - 3 new pieces of art. :)

Mame pots

Another side view of the nicer Mame pots that came out.

Log Pot

This will soon have a Juniper planted into it, pictures of that tree soon to follow. I like the textures on this pot and how the colors fell into the grooves.

Log Pot

Side view - no it's not perfect - it's hand made, not poured mold. It has 'character'.. :)

Aaron's Round Pot

This came out really well - great texture and aaron's selection of colors gives the impression of the pot sitting in a field of grass.

Aaron's Round Pot

Another view, this pot is fairly deep; not sure how it'll be used but whatever goes into it will certainly be enhanced by this creation.

Thursday, August 13, 2009

Fired and Painted

Painted and ready for glaze

Previously fired pots - have been painted and are awaiting glaze. Hope to have finished pots by this weekend, as I have a few things I'd like to move into new homes.


Sunday, August 9, 2009

Shohin Privet #1 - Patience is a Virtue?

Virtues of Patience - and Styling
Before Wiring
We will see if loss of patience wins out over early styling - or if it even matters towards the final stages of this trees creation. I had such a great vision for this tree that I went ahead and put some wiring on it - .5 and 1.5mm's were used.
Early Wiring Complete
This wiring will not stay on more than a few months; likely around late October as things cool here I will remove the wire. Privet thickens quickly; wire left on a tree too long will leave scars that may take years to heal properly.. There are still many things left for this tree to get it in shape to be Bonsai; a better revealing Nebari, future work on the deadwood at the base of the trunk. continual thickening of the main branches, shortened internode length in future growth - and time and patience. Less or more of which? :)

Haha - Karate Kid Revealed?

As my Dad asked me recently - 'are you becoming a tall Mr. Miyagi?' This was all in jest and I got a kick out of it - as actually I was not at all turned on to Bonsai by those movies at all but my own personal life transformation and interests in Meditation and nature. So, to day I find a link on one of my favorite blogs to watch, Kitsune's blog, I saw this:

http://www.phoenixbonsai.com/Days/DaysIndex.html

So I checked it out. Well, for my birthday June 22nd.. Karate Kid was released in 1984. So.. Hah!! Maybe I am... :)

Fired Bonsai Pots

Fired Bonsai Pots
These are mostly Mame sized Bonsai pots, created by myself and my friend Aaron. Will be painting and glazing this week and hopefully firing and viewing a finished creation next weekend. Winter will be full-on pot making season, this is just 1st runs to get the creative juices flowing and experience for what works - and what doesn't.


Shohin Privet #1

Shohin Privet Bonsai #1
The Dig
So, I got an itch this AM while my 2 girls were spending time at their cousin's, to go yamadori collecting (that is, to collect a tree or plant from nature). Not as difficult for me as for some, and I'm not 'too' hard to please at the moment - the free time being the decision maker! So - I took a wander down my backyard hillside into the wilderness. Lots of 'edge' plant material, and one that is hardy that I'm having fun working on that I have alot of - Privet! Here I find a specimen I'd already chopped earlier in the year as part of my 'clear the lot' project at the bottom of the hill. Time to collect my prepped Yamadori!
Yamadori Found!
Here you can see the previous 'low' cut I made earlier in the year, and also that I have completely cleared the root ball of soil. Privet are extremely hardy, not many species would I treat in such a manner, but that is the nature of Privet. Notice the thick growth this plant exhibits after being chopped, due to growing in the ground vs chopping and moving directly to a pot.
Reduction
Much reduction of the root system and deciding how to layout it's future Nebari development at this point. Also reduction in foilage, to cause the re-growth to focus in places of Taper development. All 'downward' roots have been cut, thick roots reduced. The lead branches are not cut yet - I want them to thicken a bit more close to the trunk before I begin creation of it's crown.
Front View
The last pot I have from The Monk Monestary in Conyers, GA. from a run there months ago. Perfect fit for this future Shohin Bonsai. Shohin or 'Mame' Bonsai are the ultimate miniature powerhouses - ultimately they are the best examples of bonsai size reduction in all species in the Bonsai art. I am using a 70/30 Inorganic/organic mix of Sphagnum Moss, Turface, and Lava Rock.
Rear View
The cuts have been covered in cut sealant, the tree watered, it's held in with wire through the base to allow stability as I wire it's branches in a few weeks. Again, I take my time; I allow the plant to re-establish, allow new branches to develop, see which ones die from the root reduction and cut-back; then I begin light branch shaping. (Mainly with cuts to form taper)


Saturday, August 8, 2009

Tulip poplar

Huge Tulip Poplar in my back yard - we have a few of them, and unrestrained growth and a river beyond. A bonsai collectors paradise in the form of yamadori galore. This tree gives me much Inspiration for the tiny tulip poplars that are just beginning in the 'hopeful garden'. I will have to measure, but I would estimate easily 100-120' Tall, with a diameter at the base of 10'+. I will measure soon and show - it's a Giant. (Notice the slope - we're on the edge of a flood plain, I'll have to show a pic from 5 years ago - there were 4 remnants of hurricanes that hit us in the time of 2 months - the floodwaters after the last 1 were halfway up this hill, easily 30'+ above flood level of the river way down below). Little River in Woodstock, GA, is what's behind us - wasn't so 'little!')


Tulip poplar

Annnd the crown of said Tulip Poplar Giant.. It's a beauty!

Holly Bonsai #1

Holly Bonsai #1

A more recent pic of the developing crown of the Holly - it's really popping right now, a great deal of new growth. Holly species are very 'sticky' - that is, they are hard to jin the branches, and develop motion; it's better to develop this movement and taper in Holly with cuts, and pinching early when it's still green. Looking to be a healthy tree, and fun next year to develop.


Home & Garden Blogs submit to reddit Blogarama - Blog Directory blog search directory Hobbies Blogs - Blog Rankings Blogs lists and reviews Blog Directory Bodhisattva Bonsai - Blogged Blog Ratings Web Directory Top Blogs - Increase SEO of Your Blog, Blogging Resources Gardening Blogroll Center Award Winning Home and Garden Blogs - BlogCatalog Blog Directory